Frontier Nerds: An ITP Blog

Face Recognition Strategies

Eric Mika

Face recognition is one of the mechanical turk’s canonical fortes — reliably identifying faces from a range of perspectives is something we do with out second though, but it proves to be excruciatingly tricky for computers. Why are our brains so good at this? How, exactly, do we work? How do computational strategies differ from biological ones?

Where do they overlap?

Behold: Chapter 15 of the Handbook of Face Recognition explores these questions in some detail, describing theories of how the human brain identifies and understands faces. A few highlights from the chapter follow:

First, a few semantic nuances:
Recognition: Have I seen this face before?
Identification: Whose face is it?
Stimulus factors: Facial features
Photometric factors: Amount of light, viewing angle

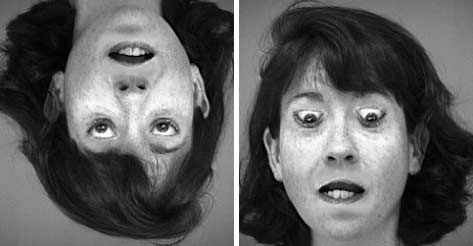
The Thatcher Illusion: Processing is biased towards typical views

Thatcher Effect

Categorization

Beyond the basic physical categorizations — race, gender, age — we also associate emotional / personality characteristics with the appearance of a face. These use of these snap judgments was found to improve identification rates over those achieved with physical characteristics alone.

Prototype Theory of Face Recognition

Unusual faces were found to be more easily identified than common ones. The ability to recognize atypical faces implies a prototypical face against which others are compared. Therefore recognition may involved positioning a particular face relative to the average, prototypical face. The greater the distance, the higher the accuracy. (The PCA / eigenface model implements this idea.)

This also has implications for the other-race effect, which describes the difficulty humans have with identifying individuals of races to which they are not regularly exposed. However, the PCA approach to face recognition actually does well with the minority faces, since they exist outside the cluster of most faces and therefore have fewer neighbors and lower odds of misidentification.

Caricature

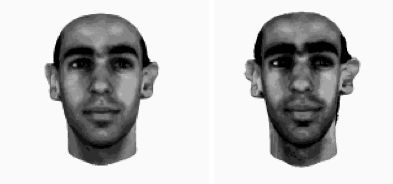
The prototype theory suggests that amplification of facial features should improve recognition and identification even further.

Here’s an example, the original face is at left, and a caricature based on amplifying the face’s distance from the average is at right:

An example of an automatically generated caricature

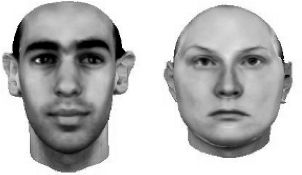
This also opens the possibility of an anti-caricature, or anti-face, which involved moving in the opposite direction, back past the average, and amplifying the result.

The original face is at left, the anti-face is at right:

Face and Anti-face

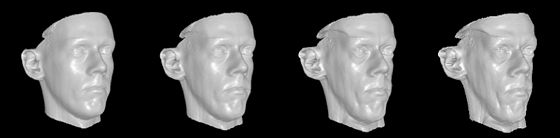
Interestingly, caricaturization also seems to age the subject. (Supporting the notion that age brings distinction:

Caricature aging

Prosopagnosia

Prosopagnosia is a condition affecting some stroke / brain injury victims which destroys the ability to identify faces, while leaving other visual recognition tasks intact. This suggests that face identification and recognition is concentrated in one area of the brain, suggesting a modular approach to processing.

(Images: Handbook of Face Recognition)

Geo Graph Bot Platform

Eric Mika

I’ve created a quick hardware sketch of the Geo Graph Bot:

A bare-bones rolling robot on the floorA bare-bones rolling robot on the floorUnderside of a bare-bones rolling robot

Current Revision

The bot receives commands over the air to steer, turn, etc. The wheels are too small, and the 9V battery is too weak for the steppers, so it’s not quite as fast / maneuverable as I expect the final version to be. Still, it works.

Here’s what it looks like in motion (it’s receiving commands wirelessly from a laptop):

Pending Modifications

Much of this version was limited by the supplies I had on hand. Several elements will change once the rest of the parts come in:

  • It still needs the compass modules. (And accompanying auto-steering code.)
  • Larger wheels (from 2" diameter to 4" or 5") should increase speed and improve traction.
  • The whole thing will be powered by a 12v 2000mAh NiMH rechargeable battery. (Instead of a pair of 9Vs.)
  • There will be a mechanism for the excretion of yarn to graph the bots path.
  • Also planning on some kind of aesthetically satisfying enclosure once I have the final dimensions.
  • I will use my own stepper drivers instead of the Adafruit motor shield.

I’m reducing the scope slightly from the originally planned three bots to just two. The parts turned out to be more expensive than I anticipated, so my initial goal is to prepare two bots, and then if time / finances allow, create a third. Part of the idea is to create a platform.

Steppers vs. DC Motors

I agonized a bit about whether to use stepper motors or DC motor to drive the bot’s wheels.

A plain DC motor seems to have some advantages in terms of control (you aren’t dealing with a digital signal), and since steering will be accomplished via a feedback loop from the compass data, their lack of precision probably would not be a big issue.

However, I already had steppers on hand, so I ended up using them instead. Steppers have a few advantages of their own. For one, there’s no need for gearing — in this case, the motor drives the wheels directly. Second, I have finer control over how far the bot travels and how it steers (assuming traction is good), so the platform itself will be more flexible for future (unknown) applications.

The big issue with steppers is that the Arduino code that drives them is all written in a blocking way… that is, you can’t run any other code while the motors are running. This was a problem, since I needed the bots to perform a number of steps in the background while it’s driving around: It needs to receive data from the control laptop, monitor the compass heading, reel out yarn, etc.

For now, I’m using some work-around code that uses a timer to call the stepping commands only when necessary, leaving time for other functions. This might not hold up once the main loop starts to get weighed down with other stuff, so I might end up writing an interrupt-driven version of the stepper library.

Haiku Laureate

Eric Mika

Concept

Haiku Laureate generates haiku about a particular geographic location.

For example, the address “Washington D.C.” yields the following haiku:

the white house jonas
of washington president
and obama tree

Much of the work we’ve created in Electronic Text has resulted in output that’s interesting but very obviously of robotic origin. English language haiku has a very simple set of rules, and its formal practice favors ambiguous and unlikely word combinations. These conventions / constraints give haiku a particularly shallow uncanny valley; low-hanging fruit for algorithmic mimicry.

Haiku Laureate takes a street address, a city name, etc. (anything you could drop into Google maps), and then asks Flickr to find images near that location. It skims through the titles of those images, building a list of words associated with the location. Finally, it spits them back out using the familiar three-line 5-7-5 syllable scheme (and a few other basic rules).

The (intended) result is a haiku specifically for and about the location used to seed the algorithm: The code is supposed to become an on-demand all-occasion minimally-talented poet laureate to the world.

Demo

Your Haiku Will Appear Here

Execution

The script breaks down into three major parts: Geocoding, title collection, and finally haiku generation.

Geocoding:

Geocoding takes a street address and returns latitude and longitude coordinates. Google makes this easy, their maps API exposes a geocoder that returns XML, and it works disturbingly well. (e.g. a query as vague as “DC” returns a viable lat / lon.)

This step leaves us with something like this:

721 Broadway, New York NY is at lat: 40.7292910 lon: -73.9936710

Title Collection:

Flickr provides a real glut of geocoded data through their API, and much of it is textual — tags, comments, descriptions, titles, notes, camera metadata, etc. I initially intended to use tag data for this project, but it turned out that harvesting words from photo titles was more interesting and resulted in more natural haiku. The script passes the lat / lon coordinates from Google to Flickr’s photo search function, specifying an initial search radius of 1 mile around that point. It reads through a bunch of photo data, storing all the title words it finds along the way, and counting the number times each word turned up.

If we can’t get enough unique words within a mile of the original search location, the algorithm tries again with a progressively larger search radius until we have enough words to work with. Asking for around 100–200 unique words work well. (However, for rural locations, the search radius sometimes has to grow significantly before enough words are found.)

The result of this step is a dictionary of title words, sorted by frequency. For example, here’s the first few lines of the list for ITP’s address:

{"the": 23, "of": 16, "and": 14, "washington": 12, "village": 11, "square": 10, "park": 10, "nyu": 9, "a": 9, "new": 8, "in": 8, "greenwich": 8, "street": 6, "webster": 6, "philosophy": 6, "hall": 6, "york": 6, [...] }

Haiku Generation:

This list of words is passed to the haiku generator, which assembles the words into three-line 5-7-5 syllable poems.

Programmatic syllable counting is a real problem — the dictionary-based lookup approach doesn’t work particularly well in this context due to the prevalence of bizarre words and misspellings on the web. I ended up using a function from the nltk_contrib library which uses phoneme-based tricks to give a best guess syllable count for non-dictionary words. It works reasonably well, but isn’t perfect.

Words are then picked from the top of the list to assemble each line, using care to produce a line of the specified syllable count. This technique alone created mediocre output — it wasn’t uncommon to get lines ending with “the” or a line with a string of uninspired conjunctions. So I isolated these problematic words into a boring_words list — consisting mostly of prepositions and conjunctions — which was used to enforce to enforce a few basic rules: First, each line is allowed to contain only one word from the boring word list. Second, a line may not end in a boring word. This improved readability dramatically. Here’s the output:

the washington square
of village park nyu new street
and greenwich webster

More Sample Output

A few more works by the Haiku Laureate:

Chicago, IL
chicago lucy
trip birthday with balloons fun
gift unwraps her night

Gettysburg
the gettysburg view
monument and from devils
of den sign jess square

Dubai
Dubai Museum Bur
in Hotel The Ramada
with Dancing Room Tour

Tokyo
tokyo shinjuku
metropolitan the night
from government view

Canton, KS
jul thu self me day
and any first baptist cloud
the canton more up

Las Vegas, NV
and eiffel tower
in flamingo from view glass
at caesars palace

eve revolution
trails fabulous heralds blue
emptiness elton

monorail hide new
above bird never jasmine
path boy cleopatra

I’ve also attached a list of 150 haiku about New York generated by the haiku laureate.

Note that the Haiku Laureate isn’t limited to major cities… just about any first-world address will work. Differences in output can be seen at distances of just a few blocks in densely populated areas.

Source Code

The code is intended for use on the command line. You’ll need your own API keys for Google Maps and Flickr.

The script takes one or two arguments. The first is the address (in quotes), and the second is the number of haiku you would like to receive about the particular location.

For example: $ python geo_haiku.py "central park, ny" 5

Will return five three-line haiku about central park.

The source is too long to embed here, but it’s available for download

Geo Graph Bots

Eric Mika

Proposal

A trio of small, wheeled robots each beholden to a particular geo-tagged social web service, tethered together with elastic string, each attempting to pull the other towards the physical location of the most recent event on its particular social network.

A number of web services — Flickr, Twitter, etc. — receive updates with geo-tagged data at a remarkable rate. The proposed robots will receive wireless updates from a laptop with this latitude and longitude information (probably on the order of a few times per second).

Using this data and an onboard compass, they will steer toward the location of the most recent photograph / tweet / whatever, and then drive furiously in this direction. This will continue until they receive the latest geo data a bit later, at which point they will set a new course and proceed in that direction.

Since the three bots will be tethered to one another with a length of string, the hope is that they will occasionally get pulled in one direction or another by their neighbors, and perhaps eventually get tangled in the string to the point where they can’t move at all.

Alternately, the bots could lay down string in their wake… sketching their path, overlap, etc.

Parts List

  • 3x bot chassis (probably laser cut wood or plexi)
  • 6x stepper motors
  • 6x wheels
  • 3x small casters
  • 3x Arduinos
  • 3x digital compass modules
  • 4x xBees (3 for the bots, 1 for the laptop)
  • 1x xBee explorer
  • 1x length of elastic string (6 feet?)
  • 3x eyelets (for string)
  • 3x rechargeable batteries

ASCII Cellular Automata: CAd nauseam

Eric Mika

There’s a slightly pathetic anticlimax when a cellular automata bound for infinity runs into the edge of a computer screen and halts. This unfortunate behavior can be diverted by the most trivial of interface elements: the scroll bar.

So, I created an HTML / JavaScript implementation of a Wolfram’s one-dimensional binary cellular automata: CAd nauseam.

The name is intended to reflect the sense of conceptual exhaustion around this particular set of 256 rules, which has been researched, poked, and prodded within an inch of its life.

Give it a try

As the CA is rendered, the page simply grows to accommodate as much output as you have patience for. It’s easy to pause, scroll back up, and reminisce about past lines. (If you’re into that sort of thing…)

In addition to the browser’s native scrollability, I added a few knobs and dials that let you manipulate the rules in real time.

Screenshot of cellular automata rendered in ASCII

In this context, ASCII doesn’t offer many endearing qualities beyond a certain nostalgic cheekiness, but I suppose one could argue that the output is easy to cut / paste and it allows the simulation to run relatively quickly in the browser. (At least compared to rendering the pixels with a table or using the canvas object.)

The code is based heavily on Dan Shiffman’s Processing example of the same CA. Just view the source to get a sense of how it works — although most of my contributions to the code are just interface-related cruft.

There are two ways to set the active rule. You can click each four-square icon to toggle that particular rule on or off. (The top three squares represent the seed condition, the single bottom square indicates whether that condition will turn the next pixel on or off.) Alternately, you can type the rule number you’d like to see directly into the text box at the top of the palette. Hit enter, or click outside the box to activate the rule.

As you change the rules, the URL will change to represent a direct-link to the current rule set. For example, you can visit /cad-nauseam/#30 to see the output of rule 30.

The rest of the interface should be self-explanatory. “Reseed” will clear the latest line and replace it with a new line with single X in the center. “Go / Stop” freezes the simulation so you can scroll through the history more easily. “Rule Info” takes you to the Wolfram|Alpha page describing the current rule.

Runs best in Safari, the experience is much slower and stickier in Firefox, IE, and Chrome.